|
 Now
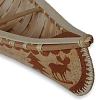
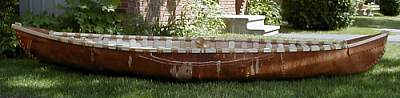
I had a canoe that looked pretty good (to me anyway) but it would not float
until I sealed it with spruce gum. Spruce gum is spread carefully over each
seam, crack and hole in the bark to waterproof it. On the boy and stern I laid
a strip of canvas soaked in gum to protect and seal the ends of the canoe.
Now
I had a canoe that looked pretty good (to me anyway) but it would not float
until I sealed it with spruce gum. Spruce gum is spread carefully over each
seam, crack and hole in the bark to waterproof it. On the boy and stern I laid
a strip of canvas soaked in gum to protect and seal the ends of the canoe.
I got some of my raw gum and heated it up on the stove in an old pot from the
second hand store. Don't use your good pots because you will 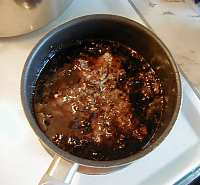 never
get the gum out. It's pretty lumpy and gross to start - see the picture on the
left. Once the gum has liquefied, you have to strain it through an old sheet
or cheesecloth to get out the sticks, bugs and bark. Then you have to add some
fat to make it less brittle. I used lard, starting with about a tablespoon.
never
get the gum out. It's pretty lumpy and gross to start - see the picture on the
left. Once the gum has liquefied, you have to strain it through an old sheet
or cheesecloth to get out the sticks, bugs and bark. Then you have to add some
fat to make it less brittle. I used lard, starting with about a tablespoon.
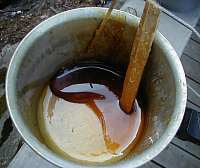 The
first time I prepared my gum it was way too soft and would not harden. It was
also kind of milky looking. I eventually scraped this layer of gum off and tried
again. It seems like the more you cook the gum the better it gets. Perhaps my
gum had a lot of water in it or something but the more I cooked it the better
it got. The picture on the right shows the gum ready for the canoe. It is a
thick amber liquid and very sticky!
The
first time I prepared my gum it was way too soft and would not harden. It was
also kind of milky looking. I eventually scraped this layer of gum off and tried
again. It seems like the more you cook the gum the better it gets. Perhaps my
gum had a lot of water in it or something but the more I cooked it the better
it got. The picture on the right shows the gum ready for the canoe. It is a
thick amber liquid and very sticky!

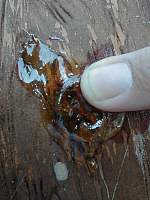 To
gum a canoe, you heat the gum up until it is liquid, but not too runny. Use
a stick and gather a bit of gum on the end. Blob the gum over the seam or hole
you want to seal. Lick or spit on your finger and press the gum into the seam.
If you don't wet your finger it will stick to the gum. It's hard to get gum
off your hands, clothes, cat, neighbours and so on. I gummed my canoe on the
front lawn of my house so everyone wanted to join in, especially the neighbourhood
kids. We all had fun.
To
gum a canoe, you heat the gum up until it is liquid, but not too runny. Use
a stick and gather a bit of gum on the end. Blob the gum over the seam or hole
you want to seal. Lick or spit on your finger and press the gum into the seam.
If you don't wet your finger it will stick to the gum. It's hard to get gum
off your hands, clothes, cat, neighbours and so on. I gummed my canoe on the
front lawn of my house so everyone wanted to join in, especially the neighbourhood
kids. We all had fun.
Now, finally, it was time to see if my canoe floated!
Back to Building a birchbark canoe
On to Paddling
© Judy Kavanagh 2001