

 |
This page shows you
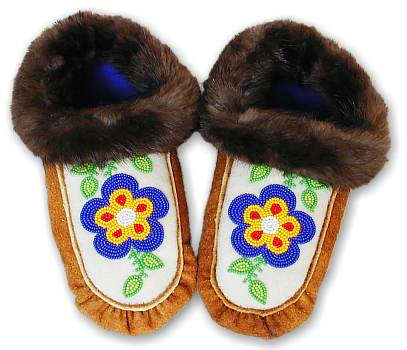
how to make a pair of woodlands style moccasins with fur trim. A free
pattern in a woman's size 7 is available as a PDF file. You need the
free Adobe Acrobat reader to view it. A pattern for women's sizes 6, 7, 8, 9, and 10 is available for ordering. |
Moose, elk and deer hides are recommended. They are softer and stretchier than other leather like cowhide and pig suede. Deer is thinner than moose and elk but it is easier to do the gathering stitch.
Commercially tanned leather has a rough and smooth side and you can put either on the outside of the moccasin. Split moosehide is rough on both sides. Brain-tanned smoked hides are also rough on both sides since the smooth layer of skin is scraped off during tanning. Brain-tanned leather is wonderful to sew but it's very expensive.
You can buy leather at leather crafts stores, from tanneries or at Native powwows. Leather is usually priced by the square foot. The area of the piece of leather is marked on the hide near the edge in fractions of square feet. There are 2 numbers. The first is whole feet and the second is quarters of square feet. So 10/3 (also written 103) means 10 3/4 square feet. Expect to pay $3-$6 per square foot for deer and moosehide, $2-$4 per square foot for split moosehide and $10-$25 or more for brain-tanned smoked deer or moosehide.
Stroud, or Melton cloth, is a closely woven wool often used for making winter coats. It can be used for the vamps of the moccasins and is especially good for doing beadwork or embroidery on. You can buy it at most fabric stores.
You will need two strips of fur, each 1-2” wide and about 16-18” long. Try buying an old fur coat or collar at a second-hand store.
Fox fur is long and fluffy and comes in white, grey, black and other colours. Mink is the most durable kind of fur. It is short and is usually dark brown or black. Muskrat is similar to mink but not as expensive. Coyote is long and tan with black and brown markings. Rabbit fur is cheap but tends to shed and wear easily. Beaver is luxurious and fluffy and is a traditional fur for moccasin trim.
When cutting fur, don’t use scissors or you will cut the fur as well as the skin. Use a knife and hold the fur up off the table to make sure you cut only through the skin.
This is used instead of regular thread for sewing leather. It is a strong waxed thread that can be split into strands like embroidery thread. Use 1 or 2 strands to sew your moccasins together. If you cannot find artificial sinew, use a strong thread such as buttonhole or quilting thread.
Also called a glover’s needle. The pointy end of the needle has a three cornered knife edge so that it cuts the leather rather than piercing it. It really makes sewing leather much easier than using a regular needle. Use as small a needle as you can for the thread you are using so it does not leave big holes in the leather. Be careful. Leather needles are sharp!
The lining should be made out of a soft material such as polar fleece or sweatshirt fleece. It is sewn together with regular thread.
There are 2 pieces for the moccasin itself: the bottom and the vamp:
For the lining there are 3 pieces: the sole, the top and the heel piece:
You will also need to cut a long thin piece of leather about 1/4" wide and as long as the outside of the vamp. This piece, called a welt, goes in the seam between the vamp and the bottom to strengthen it.
Leather is a natural material and varies in thickness, colour and stretchiness from piece to piece and within a single hide. Check for holes or markings on the hide before marking your pattern.
Try to make the stretchiest direction of the leather go across your foot instead of from heel to toe.
Since you can’t easily pin the pattern to the hide, place the pattern on the wrong side and draw around it CAREFULLY with a pen or soft pencil. Cut only one thickness of leather at a time.
Cut this out like a normal sewing pattern by pinning it onto 2 layers of fabric. A 1/4" seam allowance is included in the pattern.
Sewing the leather is done by hand using an overcast or whip stitch. Make a knot at the start and end of the seam.
Stitch two pieces together inside out, with the right sides of the leather facing each other. After the seam is finished, turn the pieces right side out.
Try and make your stitches small and neat but realise it does take practise until you can make perfectly uniform stitches. Aim for stitches that are about 1/8” apart and 1/8” deep (1/8” in from the edge of the leather). Pull the thread tight after each stitch.
To increase the strength of the seam and give it a neat appearance, you can sew a welt into the seam. This is a strip of leather, Ľ” wide, that is inserted into the seam between the two pieces of leather being joined. After the seam is sewn, trim the welt close to the seam on the right side.
If you want to decorate the vamp of your moccasins, do it before you assemble them.
Sewing the vamp to the bottoms is the hardest part of making moccasins because you have to gather the bottom to fit the vamp. This gives room for your toes. It’s hard at first to make the tucks or gathers even.
Match up the centre fronts of the vamp and bottom, right sides together. Insert the welt between the vamp and the bottom, matching up the edges. Tack the 3 layers together at the centre front. Tack point A on the vamp to point A on the bottom. Don’t forget to put the welt between the vamp and the bottom. Do the same on the other side of the foot at the point B. Now you are ready to sew.
Start at the centre front and sew the seam back to point A, then sew from the centre front back to point B.
At each stitch, make about a 1/8" tuck in the bottom piece. Try to push the tuck close together as you stitch. When you are part way down the seam you will find that you no longer have to make tucks to fit the vamp to the bottom.
When you have done both sides, turn the moccasin right side out and trim the welt with a pair of sharp scissors as close to the seam as you can without cutting the stitching.
You can sew this seam without the welt if you like but the welt strengthen the seam and helps to hide the stitching.
The lining is sewed inside out and is NOT turned right side out afterwards. With right sides together, sew the heel piece to the top on both sides using a 1/4" seam. Use a sewing machine if you have one. Sew the top to the foot piece forming a slipper shape.
Put the lining on your foot and then slip your foot into the moccasin. The back of the leather should just meet at your heel. If there is extra length, mark it and then trim it off. Take off the moccasin.
Find the middle of the back
edge and mark it. Then measure ľ” on either side of the centre and mark these
points. Finally, measure ľ” in (towards the toe) at the two points and mark
them. Cut from the edge to the 2 points like this:
Sew the back seam from the
top down to the two cuts. Add a welt in the seam if you wish. Sew the top of
the T seam, then cut off the extra flap and sew the bottom of the T using a
welt if you like.
When complete, the back seam will form an upside down T like this:
Insert the lining into the moccasin. Trim the lining to fit exactly around the top edge and baste it to the moccasin.
Measure around the top opening of the moccasin to determine how long a piece of fur you need. Cut a piece of fur this length and 1”-1 Ľ” wide. Try to make sure the fur for the two feet are similar in colour and thickness.
The fur is sewn on like you would sew a bias binding. With the right side of the fur facing the right side of the moccasin, sew from the heel seam all around the foot back to the heel using an overcast stitch. Trim any extra length and sew the two ends of the fur together. Turn the moccasin inside out and tack the fur to the inside of the moccasin.
Now put on your moccasins and see how wonderful they feel!
© Judy Kavanagh 2001