|
 Once
the inwales and outwales are lashed into place along the middle of the canoe
you can work on the bow and stern. To
Once
the inwales and outwales are lashed into place along the middle of the canoe
you can work on the bow and stern. To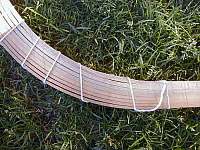 start with you need to make the stems. These are the wooden pieces that fit
inside the very front and back of the canoe. I made my stems from cedar pieces
about 1 3/4 inches wide, 5/8 inch deep and 27 inches long. The 5/8 inch side
is tapered so it is 3/8 inch thick at the smaller side. They were split the
opposite way from the ribs so that the rings are running across the flatter
part of the wood. I then split each stem piece with a knife part way along its
length into 8 pieces so that it would bend easily to form the curve of the canoe
end. You can see the splits in the close up picture on the right (click on it
to see it bigger).
start with you need to make the stems. These are the wooden pieces that fit
inside the very front and back of the canoe. I made my stems from cedar pieces
about 1 3/4 inches wide, 5/8 inch deep and 27 inches long. The 5/8 inch side
is tapered so it is 3/8 inch thick at the smaller side. They were split the
opposite way from the ribs so that the rings are running across the flatter
part of the wood. I then split each stem piece with a knife part way along its
length into 8 pieces so that it would bend easily to form the curve of the canoe
end. You can see the splits in the close up picture on the right (click on it
to see it bigger).
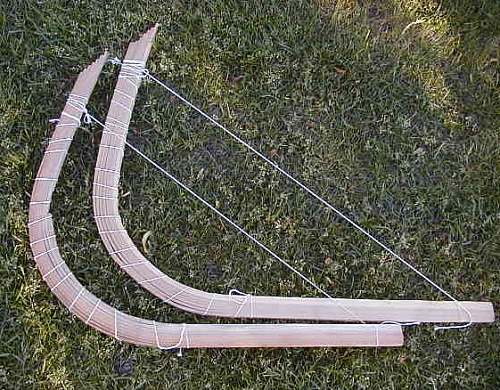
 To
shape the stem into the correct position I first drew out the shape I wanted
on a piece of cardboard. Then I steamed the stems using my friendly neighbourhood
canoe builder's steam box. This is just a plywood box over a kettle. I think
pouring boiling water over the stem pieces would work just as well. Once the
stems were nice and hot and bendy, I bent them over the cardboard drawing. To
keep them in shape I tied them with string (click on the picture to see it bigger).
To
shape the stem into the correct position I first drew out the shape I wanted
on a piece of cardboard. Then I steamed the stems using my friendly neighbourhood
canoe builder's steam box. This is just a plywood box over a kettle. I think
pouring boiling water over the stem pieces would work just as well. Once the
stems were nice and hot and bendy, I bent them over the cardboard drawing. To
keep them in shape I tied them with string (click on the picture to see it bigger).
The next pieces you need are the manboards, or headboards. Not all birchbark
canoes have them but I decided to make them. These are flat boards that fit
into the bow and stern, wedged between the inwales and the stems. I think they
give a bit of strength to the bow and stern as well as hiding any nasty looking
bits inside. I actually bought a couple of pieces of cedar to make my manboards
as none of the 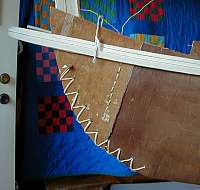 pieces
I had were wide enough. It cost be $3 or so for a cedar board. With the stems
temporarily fit into place I made a paper pattern for the manboards and then
cut them out of the cedar boards.
pieces
I had were wide enough. It cost be $3 or so for a cedar board. With the stems
temporarily fit into place I made a paper pattern for the manboards and then
cut them out of the cedar boards.
Now I was ready to cut the bow and stern bark to shape. With the stems pegged in place temporarily I cut away the extra bark so it just came together past the stems. I lashed the ends with spruce roots through the stems using a crisscross stitch.
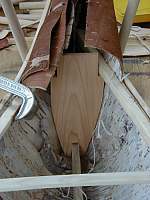
 On
the right (click on the picture to see it bigger) you can see the insides of
the bow of the canoe. The inwales are not quite long enough (because I broke
one of them!) so they are tied together with rope instead of meeting properly
at the bow. You can see the manboard in position and the lashing that keeps
it in place. Also you can see how the stem and outwales meet.
On
the right (click on the picture to see it bigger) you can see the insides of
the bow of the canoe. The inwales are not quite long enough (because I broke
one of them!) so they are tied together with rope instead of meeting properly
at the bow. You can see the manboard in position and the lashing that keeps
it in place. Also you can see how the stem and outwales meet.
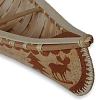
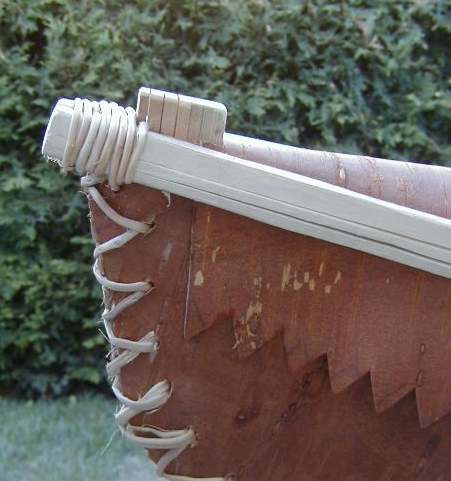 Finally,
I put a covering piece of birchbark on over the bow and stern pieces, trimmed
the outwales off and lashed them together (click on the picture to see it bigger).
Finally,
I put a covering piece of birchbark on over the bow and stern pieces, trimmed
the outwales off and lashed them together (click on the picture to see it bigger).
Back to Building a birchbark canoe
On to Adding sheathing and ribs
© Judy Kavanagh 2001