|
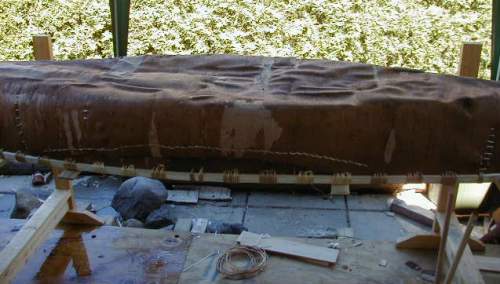 Now
you have a nice canoe with inwales, outwales, nicely lashed bow and stern and...
a lumpy bottom! My canoe looked terrible at this point when I turned it over
(click on the picture to really see how awful it was). I was not sure that the
bark would ever get smoothed out but putting my faith in the process I continued
on.The next step is to put in the sheathing and ribs. This job took me a whole
day and evening.
Now
you have a nice canoe with inwales, outwales, nicely lashed bow and stern and...
a lumpy bottom! My canoe looked terrible at this point when I turned it over
(click on the picture to really see how awful it was). I was not sure that the
bark would ever get smoothed out but putting my faith in the process I continued
on.The next step is to put in the sheathing and ribs. This job took me a whole
day and evening.
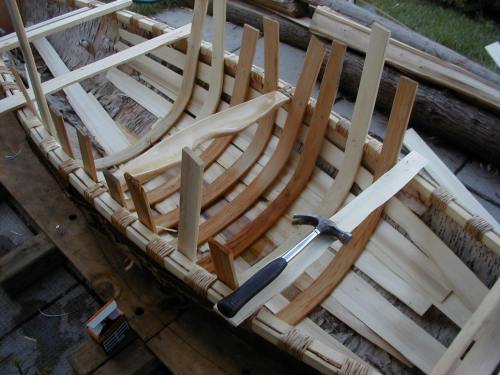
I had prepared the ribs ahead of time. They were split to a rough shape with a hatchet and knife. The first few ribs I then shaped to size (2 inches wide by 3/8 inches thick) using a crooked knife but it took a long time. My roommate offered the use of his thickness planer which speeded up the process greatly. I hate power tools but this one saved me a lot of time. I could just feed in the roughly shaped ribs pieces and after a few passes they came out exactly 3/8 inches thick. Then I just had to trim the sides to the right width and round off the edges that would be on the inside of the canoe. I needed about 38 ribs, with some extras in case of breakage.
The sheathing consisted of very thin pieces of cedar, split to the thickness
of paper, or at least cardboard. Each piece was 3 or 4 inches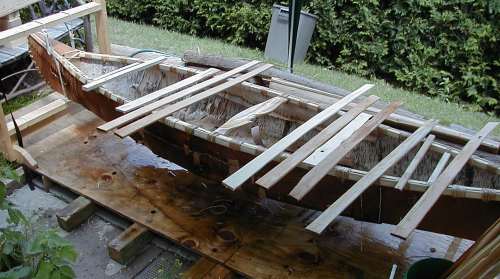 wide and as long as I could get them.
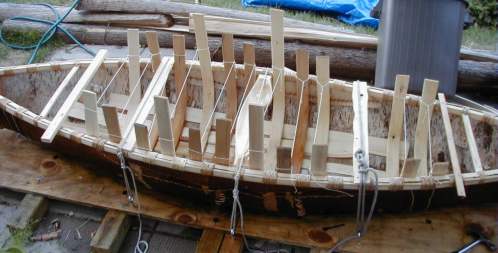
According to the books I read, before you put in the ribs, you had to hang the canoe up by the bow and stern so the ribs could take a nice rounded shape in the bottom. So I hung my canoe up using slings of rope hung from a canoe stand at either end. I nailed some extra crosspieces onto the gunwales to prevent the canoe from getting too wide and I laid my ribs on the canoe to see where they would each fit. Each rib was marked where it would bend at the side of the canoe. You have to be careful not to mark the ribs with pencil or anything that will score them because it can cause the rib to buckle at that point. I experimented with all kinds of marking techniques from charcoal to crayons. A few scrap pieces of sheathing were put in the canoe to protect the bark.
 Each
rib was soaked in the bathtub for several days and then soaked and steamed in
a big pot of boiling water on my stove. I ladled hot water down the ribs until
I hoped they were bendy enough. Then I bent each rib by hand (and foot) to the
approximate shape and tied it with string. Then I ran out the door and put it
in the canoe, bending it more or less as needed. To hold each rib in place as
it driec, I nailed it to the gunwales. The ribs were not inserted under the
gunwales at this point and were not trimmed to the right length yet.You can
see all this in the picture (click on it to see it bigger). I worked from the
center of the canoe outwards to the ends. I broke several and other decide to
kink nicely near a weak spot or knot hole You're not supposed to use wood with
knots for ribs but I didn't have enough really goo cedar so I went with the
knotty bits anyway.
Each
rib was soaked in the bathtub for several days and then soaked and steamed in
a big pot of boiling water on my stove. I ladled hot water down the ribs until
I hoped they were bendy enough. Then I bent each rib by hand (and foot) to the
approximate shape and tied it with string. Then I ran out the door and put it
in the canoe, bending it more or less as needed. To hold each rib in place as
it driec, I nailed it to the gunwales. The ribs were not inserted under the
gunwales at this point and were not trimmed to the right length yet.You can
see all this in the picture (click on it to see it bigger). I worked from the
center of the canoe outwards to the ends. I broke several and other decide to
kink nicely near a weak spot or knot hole You're not supposed to use wood with
knots for ribs but I didn't have enough really goo cedar so I went with the
knotty bits anyway.
 Everything
was going along really well until I started seeing what shape the bottom of
the canoe was taking. Perhaps you can see in the previous picture that it was
almost perfectly semi-circular. Those of you who paddle will know that this
sort of shape makes for a very tippy canoe. I panicked! After calming down I
phoned up Jack LaPointe of Westport Canoes who is a very experienced cedar canvas
canoe builder and we talked. In the end I decided that hanging the canoe up
was not the right thing to do in this case. Instead I went out and bought some
big screw eyes and screwed them into the building
Everything
was going along really well until I started seeing what shape the bottom of
the canoe was taking. Perhaps you can see in the previous picture that it was
almost perfectly semi-circular. Those of you who paddle will know that this
sort of shape makes for a very tippy canoe. I panicked! After calming down I
phoned up Jack LaPointe of Westport Canoes who is a very experienced cedar canvas
canoe builder and we talked. In the end I decided that hanging the canoe up
was not the right thing to do in this case. Instead I went out and bought some
big screw eyes and screwed them into the building 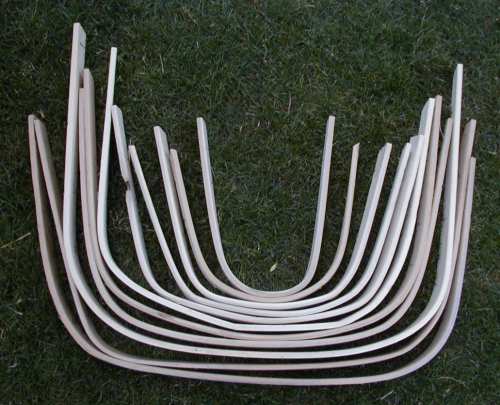 platform.
I found some nice thick rope and tied it across the canoe from one screw eye
to another in the middle and at the two thwarts. The plan was to hold the canoe
as flat as possible against the force of the ribs which wanted to be rounded.
platform.
I found some nice thick rope and tied it across the canoe from one screw eye
to another in the middle and at the two thwarts. The plan was to hold the canoe
as flat as possible against the force of the ribs which wanted to be rounded.
Now I resteamed the ribs and started putting them in again. And this time the shape of the canoe looked much better. I put in all the ribs and left them to dry for a day or so. Then I sawed each one off to about the height of the gunwales, carefully numbered them in order, banged out the nails and took the ribs out again. They nicely nested together. One more thing had to be done and that was to bevel the ends of the ribs so they would fit under the inwales.
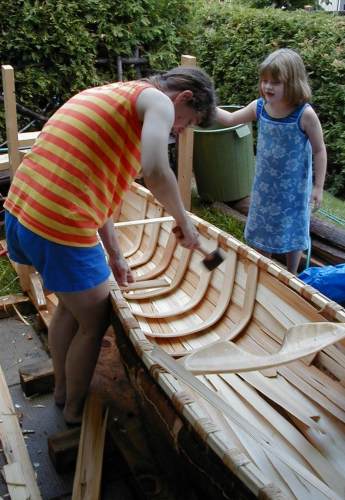 The
next stage was to prepare the inside of the canoe for the sheathing and ribs.
First I trimmed any loose bits of bark away. Then I put spruce gum and canvas
patches over the seams and any weak spots. Then I started laying in the sheathing,
starting with one end. Beginning in the bottom of the canoe I tucked the ends
under the manboard. Each piece of sheathing overlapped the one below it like
shingles. This helps to keep water from getting underneath. Once the end of
the canoe was covered with sheathing I began putting the ribs loosely in place.
Then I started adding sheathing and ribs at the other end, moving to the middle
of the canoe until everything met in the middle. When a piece of sheathing ran
out I added another piece. I banged the ribs upright with a rubber mallet and
piece of wood into their final positions wedged under the gunwales.
The
next stage was to prepare the inside of the canoe for the sheathing and ribs.
First I trimmed any loose bits of bark away. Then I put spruce gum and canvas
patches over the seams and any weak spots. Then I started laying in the sheathing,
starting with one end. Beginning in the bottom of the canoe I tucked the ends
under the manboard. Each piece of sheathing overlapped the one below it like
shingles. This helps to keep water from getting underneath. Once the end of
the canoe was covered with sheathing I began putting the ribs loosely in place.
Then I started adding sheathing and ribs at the other end, moving to the middle
of the canoe until everything met in the middle. When a piece of sheathing ran
out I added another piece. I banged the ribs upright with a rubber mallet and
piece of wood into their final positions wedged under the gunwales.
And finally, I was done! Only one more step left.
Back to Building a birchbark canoe
On to Gumming
© Judy Kavanagh 2001