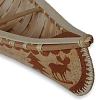
|
 Now
the canoe is ready for the inwales and outwales. These are the inside and outside
Now
the canoe is ready for the inwales and outwales. These are the inside and outside
 pieces
of cedar that run along the top of the canoe. I made these out of cedar logs,
split very carefully and then shaped with a knife and plane. My outwales are
1 inch by 1/2 inch thick and the inwales are 1 inch by 3/4 inch thick. I bought
a nice shaped carrying thwart made out of birch and made two more thwarts for
the front and back out of a white ash tree I had previously cut to try making
baskets from. I made mortise and tenon joints with a chisel to join the thwarts
and inwales but the inwales are joined with temporary thwarts made of scrap
cedar tied together for now.
pieces
of cedar that run along the top of the canoe. I made these out of cedar logs,
split very carefully and then shaped with a knife and plane. My outwales are
1 inch by 1/2 inch thick and the inwales are 1 inch by 3/4 inch thick. I bought
a nice shaped carrying thwart made out of birch and made two more thwarts for
the front and back out of a white ash tree I had previously cut to try making
baskets from. I made mortise and tenon joints with a chisel to join the thwarts
and inwales but the inwales are joined with temporary thwarts made of scrap
cedar tied together for now.
On the left you can see the thwarts and inwales lashed together to see how it will look (not very symmetrical at this point). You can't see it but the outside bottom edge of the inwales (which will be against the bark in the canoe) has the corner cut off. This is to wedge the ribs into to hold them in place.
I carefully set the inwale and thwart assembly into the canoe but one of the stakes was too tight and the inwales would not fit into place. I pushed too hard and disaster struck - one of the inwales broke! After a lot of nasty words I realized that the inwale could still be used if I cut it off at the broken spot and moved the joints, plugging the previous holes. The resulting inwale was not quite long enough but would do. This time I loosened the tight stake, used a lot of hot water, and worked gently to put the inwales in place. Once they were in position I trimmed the extra bark off above the inwales.
 Now
it's time to put the outwales on. These pieces take the graceful upward shape
of a
Now
it's time to put the outwales on. These pieces take the graceful upward shape
of a 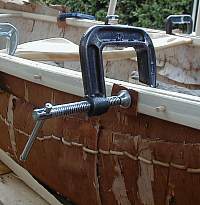 canoe
at the ends and in order to be able to bend like this they must be tapered and
split. I split the outwales horizontally so each piece would bend independently
upwards. Then I clamped the outwales into place. In the picture (click on it
to see it big) you can see the split outwale and how the inwales and outwales
are clamped together, using a small piece of scrap bark to protect the soft
cedar from the metal clamps.
canoe
at the ends and in order to be able to bend like this they must be tapered and
split. I split the outwales horizontally so each piece would bend independently
upwards. Then I clamped the outwales into place. In the picture (click on it
to see it big) you can see the split outwale and how the inwales and outwales
are clamped together, using a small piece of scrap bark to protect the soft
cedar from the metal clamps.
Next the inwales and outwales are pegged together. I used hardwood dowels. I drilled holes through the inwales and outwales using my trusty hand drill, pounded the pegs into place and then sawed them off flush. Once I had finished doing this I realized that I had cut the bevels on the inwales on the wrong side and there was nothing for the ribs to catch on. There was nothing to do but lie upside down inside the canoe and recut them with a knife!
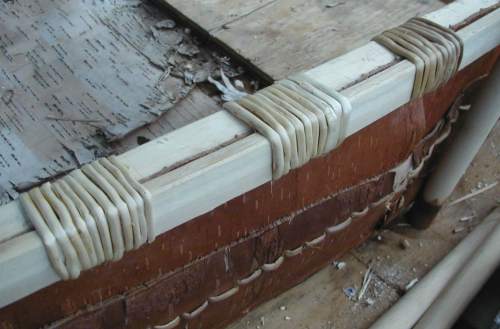 Next
come one of the most time consuming parts of building a birchbark canoe - lashing
Next
come one of the most time consuming parts of building a birchbark canoe - lashing
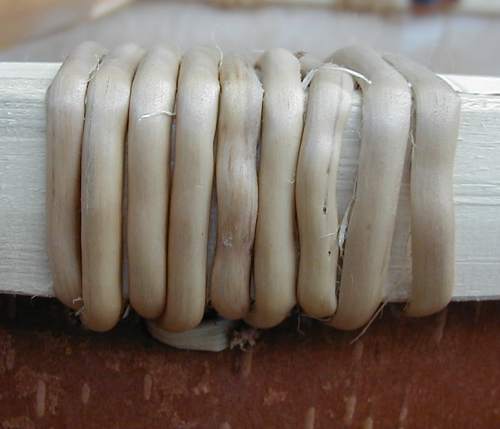 the
inwales and outwales together with spruce roots. You start by wedging one end
of the root between the inwales and outwales. Then you lash them together round
and round, ending by taking the root back through some of the previous holes.
Click on the pictures to see them bigger.
the
inwales and outwales together with spruce roots. You start by wedging one end
of the root between the inwales and outwales. Then you lash them together round
and round, ending by taking the root back through some of the previous holes.
Click on the pictures to see them bigger.
I found I needed about 5 to 6 feet of root for one lashing. My roots were not as straight as I would have liked, which would have made for neater lashings. The position of each lashing was marked because it has to be in between where the ribs will be.
Back to Building a birchbark canoe
On to Bow and stern
Judy Kavanagh 2001